
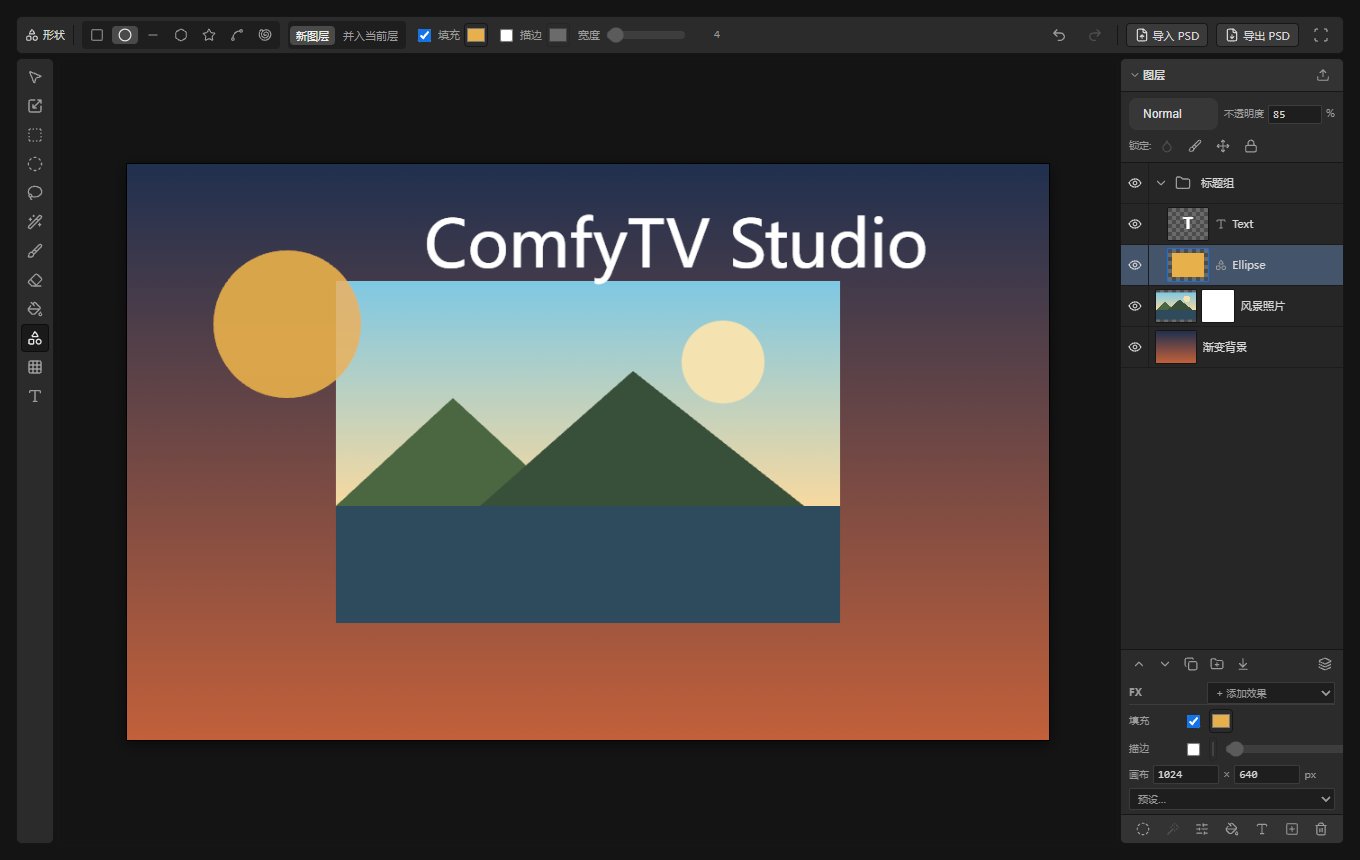
Layer Editor in ComfyTV
What this node does
Layer Editor is a rich in-browser editor that produces images for your graph. You build a multi-layer document on an artboard — paint, mask, add shapes and text, transform and warp — and the editor captures the flattened composite (and, when you have several layers, a per-layer batch) as ComfyTV image snapshots. Nothing runs on the GPU; all editing and capture happen live in the browser, so there is no ▶ Run wait for the drawing itself. Because it sits in theComfyTV/Input category, it is a starting point: draw or assemble something and feed it downstream to generation, editing, or compositing stages. Its outputs are ComfyTV snapshots, not native tensors — insert a Bridge to feed native ComfyUI nodes (bridges docs).
When to use it
- Assemble a rough composite (background + subject + logo) before sending it to an edit or inpaint stage.
- Paint a precise mask by hand — brush onto a layer’s mask channel, use the magic wand, or convert a selection.
- Add title text, shapes, or annotations to an image without leaving ComfyTV.
- Bring in a PSD, edit its layers, and export the result — or export your work back out as a PSD.
The editor
The card is a three-zone editor with a top toolbar, a left tool strip, the canvas, and a right layers panel. A maximize button (top-right) blows it up to fullscreen; the same button toggles back. Tool strip (left). One button per tool: Select (move layers), Transform (scale/rotate), Marquee and Ellipse marquee, Lasso, Magic wand, Brush, Eraser, Paint bucket, Shape, Warp, and Text. Context toolbar (top). Shows the active tool’s name and its options, which change per tool:- Brush / Eraser — a Content vs Mask target toggle (paint the pixels or paint the layer’s mask), plus size (2–400), hardness (0–1), opacity (0–1), and a color swatch (color shows for the brush on content).
- Shape — pick a kind: rectangle, ellipse, line, polygon, star, arc, spiral. Choose New layer vs Combine into the active layer; polygon/star expose sides (3–24), star a point ratio, spiral turns; toggle fill and stroke with their colors and a stroke width (1–100).
- Selection tools (marquee/ellipse/lasso/wand/bucket) — the wand/bucket expose threshold (0.01–1), anti-alias, and contiguous; other selection tools expose a radius and selection-modify actions feather / grow / shrink / border, plus Fill and Stroke the selection with the current color.
- Transform — Apply or Cancel the pending scale/rotate.
- Warp — a mesh warp with a 3×3 / 4×4 / 5×5 grid and Apply / Cancel.
Workflow / step by step
- Drop the Layer Editor node onto the canvas. It opens with a blank artboard (default 1024×1024; the size is stored internally).
- Add a base layer — upload an image or add one from the asset library via the layers panel.
- Build up: paint on a new layer, add a shape or text layer, or bring in more images. Reorder and set blend mode/opacity per layer.
- Refine with masks and selections — brush onto a layer’s Mask target, or make a selection with the marquee/lasso/wand and feather/grow it.
- Transform or warp pieces into place; Apply when happy.
- The editor continuously captures the composite. The flattened result flows to image; when the document has more than one layer, a per-layer batch flows to images.
- Connect image (or images) downstream, or Export PSD to keep an editable copy.
Inputs and outputs
The document itself (
layer_state), the artboard width/height, and the capture URLs are stored internally on the node and are not sockets you wire.
Tips
- The Content vs Mask toggle is the heart of hand-masking: switch to Mask and brush white to reveal / black to hide, without touching the pixels.
- Import PSD brings a layered file in with its layers intact; Export PSD sends your document out as a real PSD you can reopen elsewhere.
- Undo/redo cover editing steps — use them freely; the layers panel locks (like lock-alpha) prevent accidental paint on a finished layer.
- The per-layer images batch only appears once you have two or more layers, so a single-layer document just outputs the flattened image.
Related nodes
- Storyboard Editor — reuses this same editor engine, one instance per shot board.
- Image Edit / Inpaint — natural downstream stages for a composite or hand-painted mask.
- Bridge (from Image) — convert the capture to a native ComfyUI
IMAGEfor core nodes.