
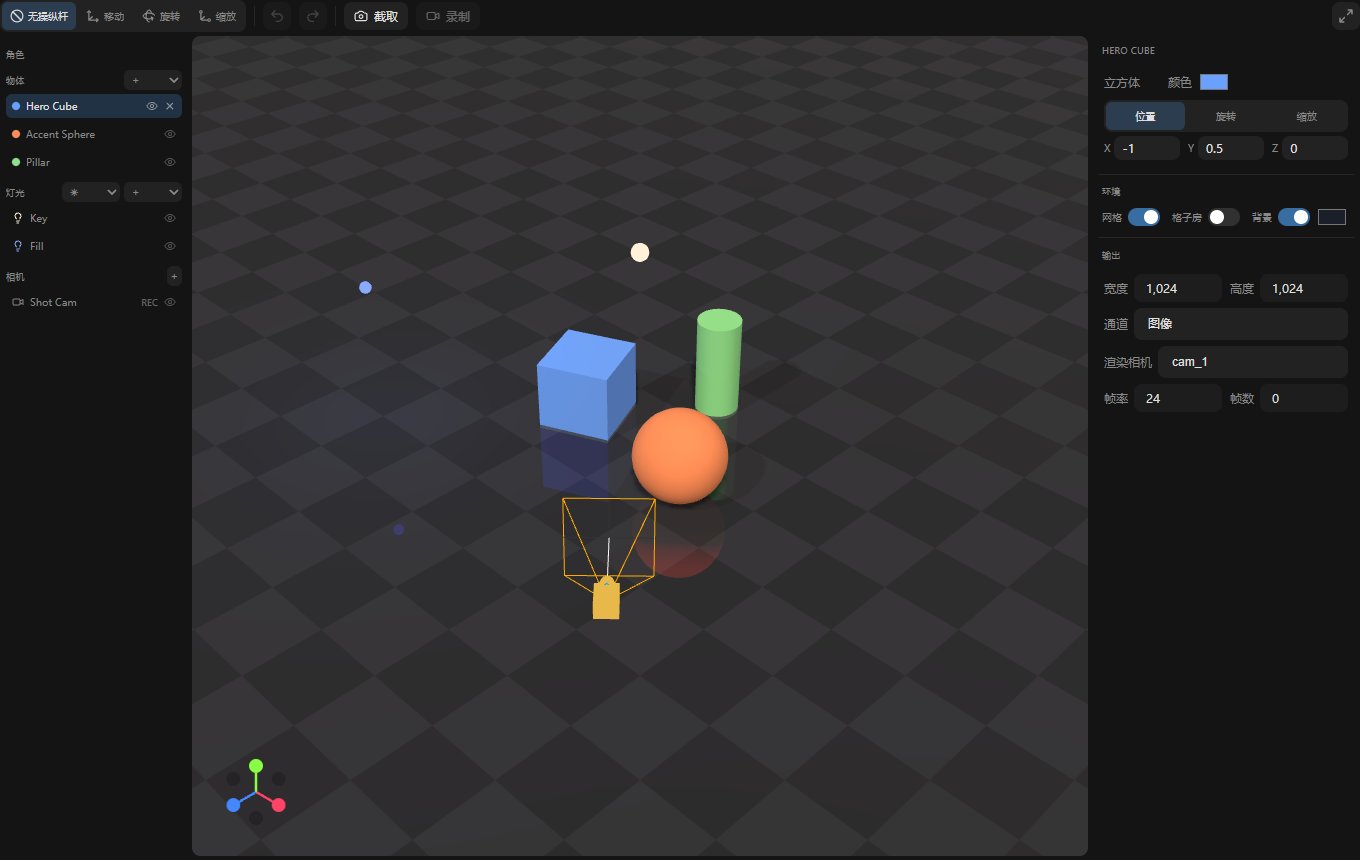
3D Scene in ComfyTV
What this node does
3D Scene is a full in-browser 3D staging tool. You assemble a scene in a live WebGL viewport — drop in animated characters, geometry primitives, your own imported models, lights and cameras — pose everything with move/rotate/scale gizmos, then use the toolbar to Capture a frame or Record a clip. What you shoot becomes the node’s project snapshots. It is not a text-to-3D generator; it is a set you dress and shoot. The viewport shares ComfyTV’s single WebGL renderer with the other 3D nodes, so it stays light even with several scenes on the canvas. Everything a creator does lives in three outputs: the picked still image, the recorded video, and the multi-camera images batch. All the geometry, camera and output settings are stored internally as scene state JSON; there are no exposed number widgets — you drive it all through the editor UI.When to use it
- Set up a controllable 3D reference (character + camera angle) to feed a ControlNet-style image/video workflow via the depth, normal, or OpenPose channels.
- Block out a shot with multiple cameras and render one clean pass per camera in a single Capture.
- Animate a character clip along a camera path and Record a short driving video for I2V/V2V.
- Compose props and lights to art-direct lighting or silhouette before generating.
The editor
The node is a three-column workbench with a toolbar on top and an optional timeline strip below. Top toolbar (left to right):- Gizmo modes — None, Translate, Rotate, Scale. Pick one and drag the on-screen gizmo to transform the selected object. Modes gray out when they don’t apply to the current selection.
- Undo / Redo — full history of scene edits.
- Capture — renders the current frame (in the selected channel) and uploads it as the still
image. If the scene has more than one camera, it also produces theimagesbatch, one entry per camera. - Record — captures an animated clip to the
videooutput. Enabled only when the scene has a recordable duration (an animated character or a moving camera) and the browser supports recording. - Fullscreen — pops the editor out to fill the screen (Esc to exit).
- Add Character — pick from the available rigged model library; characters carry animation clips.
- Add Object — primitives:
cube,sphere,cylinder,plane(each has an editable color). - Add Model — insert one of your imported/uploaded GLB model assets.
- Add Light —
directional,point, orspot, plus a lighting-preset dropdown (e.g. three-point rigs) that populates a whole setup at once. - Add Camera — adds a scene camera. The camera currently chosen for output is tagged REC in the list.
- Character / Model panel — choose an animation clip, set speed, start offset and loop, and edit position/rotation/scale. Models add a Fit to scene button.
- Primitive panel — color plus transform.
- Light panel — color, intensity, and light-type-specific settings (range, cone angles).
- Camera panel — bind a camera preset (a canned move) or stay a free camera; free cameras expose a FOV slider (10–140°) and position/rotation; preset cameras expose tuning sliders, an X/Y/Z position offset, a reverse toggle and Reset. An eye button looks through the camera.
The four capture channels
The Channel dropdown selects what the render passes emit — the same for Capture and Record:- color — the normal lit beauty render.
- depth — a normalized grayscale depth map (near = bright), ready as a depth condition.
- normal — a surface-normal map (the classic blue/purple normal render).
- openpose — an OpenPose skeleton overlay projected from each character’s rig, for pose-conditioned generation.
Workflow / step by step
- Add a Project node, then Add Node → ComfyTV → Input → 3D Scene.
- From Add Character (or Add Model) drop in a figure; from Add Light apply a lighting preset.
- Orbit the viewport to frame the shot, or Add Camera, select it, and look through it.
- In the inspector, set the character’s animation clip, speed and loop.
- In Output, set width/height and pick a Channel (e.g.
depthfor a depth condition). - Click Capture for a still, or set FPS/Frame count and click Record for a clip.
- Feed image / video / images downstream — insert a Bridge to convert to native ComfyUI tensors for a ControlNet workflow.
Inputs and outputs
The node has no user-facing input widgets — the scene, channel, size and captured media are all stored internally and driven by the editor. Its outputs are project snapshots:COMFYTV_* outputs are project references, not native ComfyUI tensors. To wire them into native nodes (ControlNet, etc.), add a Bridge — see the bridges guide.
Tips
- Record is disabled until something in the scene actually animates (a playing clip or a moving/preset camera) — add motion first.
- The images batch only appears when you have two or more cameras; with a single camera, use image.
- Use look through on a camera before capturing so the framing you shoot matches the framing you see.
depth,normalandopenposeare meant as conditioning maps — pair them with a matching ControlNet in the downstream workflow.- The viewport shares one WebGL context across all 3D nodes; if a scene looks blank after heavy canvas edits, re-select an object to force a redraw.
Related nodes
- Model 3D / Model Loader — prepare a
COMFYTV_MODELGLB to bring in via Add Model. - Material — author a PBR material to apply to imported parts.
- Bridge → / ← ComfyTV Image/Video — convert captures to and from native ComfyUI tensors for ControlNet.
- Image / Video Stage — consume the captured stills or clips as generation conditions.